Step 1 - Create a Class
When you want to create a new class you will click on the “+ Create New Class” button at the top right of the classes section. Once clicked a pop up will appear asking you to name the new class. Click OK to continue.
If you are wanting to use a 3rd party syncing option(Clever Classroom, Google Classroom, Canvas, etc) please use the link below for instructions on the desired option.
Step 2 - Create a Grading Profile
After your Class has been created you will want to configure your Grading Profile for your students. This is where you determine how the students will be graded and which lessons will be assigned.
On the Grading Profiles page, select Create New Profile in the top right, and assign a name. Typically we see that most teachers assign a name that matches the WPM speed that you want the students to achieve.
Additional Grading Profile information available HERE
Setting a Default Grading profile is a great way to save time, your students will automatically be assigned to your “default” grading profile whenever their student account is creating. Eliminating the need to assign the profiles individually each time.
To assign a default grading Profile select the desired profile on the Grading Profiles page, and select Profile Options in the top right, then select Set as Default.
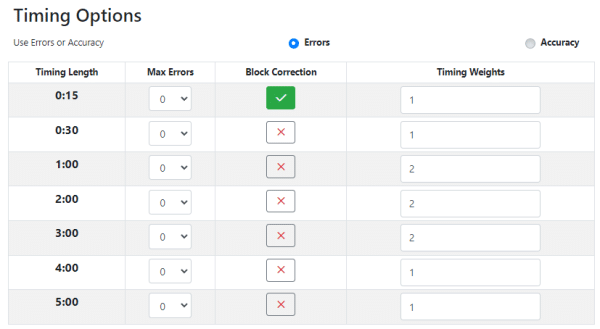
Timing Options – The Timing Options lets you decide if you want to grade your students off of the max number of errors allowed per timing(you will decide how many errors are allowed per timing length,) or if you would rather the students have an Accuracy Percentage goal(ex. 95% accuracy)
You are also able to block or allow the students from using “Correction Keys” such as backspace, delete, arrow keys(this helps force the students to use correct keyboarding techniques and increase their accuracy score.

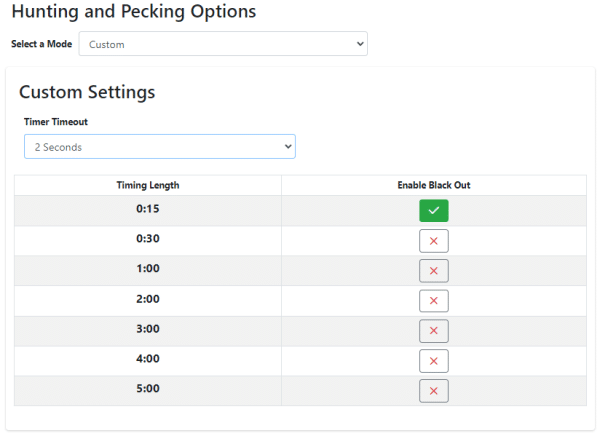
Hunting and Pecking – These are our patented techniques to help break the hunting and pecking cycle.
Timer Timeout – Our default is 2 seconds. This is a timer that starts as soon as the students start typing, if there is a gap of more than 2 seconds between keystrokes the program will stop the student, and provide them instructions to keep their eyes on the screen and fingers on the keyboard. Paired with our Blackout Timer, it makes it virtually impossible for the students to hunt and peck.
Blackout Timer – This feature starts as soon as the students start typing, it will gray out what they are actively typing acting as a “virtual keyboard cover”
The idea is that when the two are active, it prevents the students from memorizing a block of text, then looking down at their keyboard to type it out. Once they finish the block they have memorized, they will then look back up at the screen to view the last word or character that was typed. But because the Blackout Timer is active, they are unable to see what they typed last. Essentially breaking the hunting and pecking cycle.

Goal Settings – Scores Required determines the number of scores required before a student is able to progress to the next lesson.
Minimum WPM – The minimum WPM a student must get on a timing for their score to save.
Goal WPM – This is the WPM score the students will need to achieve to get an A in the class. This is determined by the Grading Scale.
Goal Effort – Lets you set an amount of time that the students must spend typing in the program, either a daily or weekly goal.
Section Assignments – This is where you determine what lessons the students are to complete, and the grade weight that each lesson or section has on their final grade.
Each lesson with a weight of 0 is marked as an optional lesson for the students. They can do it, but it won’t affect their grade in any way.
Step 3 - Creating Students
To create a student manually you will need to assign their class and grading profile. Then you will need to enter their name and password.
If you enter the students email address this will be their username to log in. If no email address is provided, then we will generate a username for the student to use.
Importing Students – Alternatively if you have a .csv file with all of your students and their information, then you can import them all at once using our guided importing tool.
More detailed information available HERE
Creating Custom Lessons - Optional
Custom Lessons allows you to create lessons and timings with your own text, either from web articles, stories, or you can even import a lesson from any of our other programs.
Select Create New Lesson and give it a name. The timing screen will then appear, and you can enter the desired text you would like the students to type. Then you can adjust the timing length from 15 seconds up to 5 minutes.
Once you save the lesson, you will need to assign it to your students grading profile, under Section Assignments.
More detailed information available HERE
Creating Tests - Optional
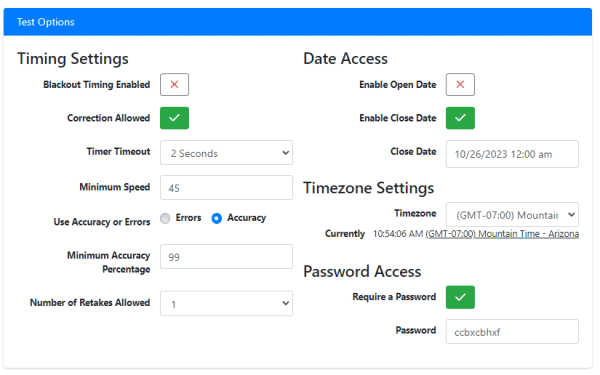
Tests are much like our Custom Lessons, the only difference being that tests can have custom settings that differ from your grading profile. So you could make the test require students to achieve higher WPM scores and less errors.
More detailed information available HERE

Creating Access Schedules - Optional
An Access Schedule allows you to control if your students have access to the program 24/7 or you can set it so that the students are only able to work in the program during class or school hours.
Additional information available HERE
Reports Center
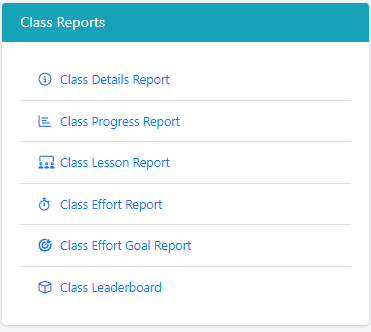
The reports center is where you can find all of the students progress and course information.
Class Details: Displays students and their course information(Login info, Class Assignments, Profile Assignments)
Class Progress: Displays the students progress from a high level. Allows you to see where each student is at a glance.
Class Lesson: Displays a more detailed view of each lesson timing scores.
Class Effort: Displays the amount of time each student has spent typing in each lesson.
Class Effort Goal: If you have a daily or weekly effort goal set, this report will show the amount of effort the students have spent in the program for the day or week.
Additional information available HERE

