Keyboarding Online has the ability to sync your Canvas classes and students with Keyboarding Online. This means that you can easily create your students inside Keyboarding Online and keep them updated through out the course. The other benefit is that students will be able to sign into the program with Canvas. No need to worry about remembering another set of passwords.
What it is NOT
Canvas Sync is ONLY for syncing/importing classes and students right now. There is no grades or assignments sent back at this time. There are no options, apps, or modules created inside Canvas to manage the application. It is simply a way to sync your classes and account inside Keyboarding Online, and provide the students with an option to login with Canvas.
The Canvas Sync cannot be used with other 3rd party rostering options, meaning you cannot sync with Canvas, but then require the students to click the Sign In With Microsoft 365.
What data is shared
Student email address
Student First/Last Name
Canvas User ID
Canvas Course ID
Section
This data is only used to add student information to the Keyboarding Online system class which is managed by the Canvas course instructor. Keyboarding Online does not sell nor share any student information with any third party. Furthermore, Keyboarding Online does not initiate contact with any student.
Getting Started
To get started, your Canvas Administrator will need to create a set of Developer Keys inside Canvas. These keys give Keyboarding Online access to grab the data needed to properly sync your classes.
Click on “Admin” on the Canvas sidebar
Click on “+ API Key”
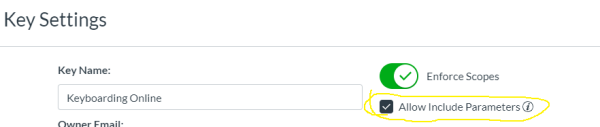
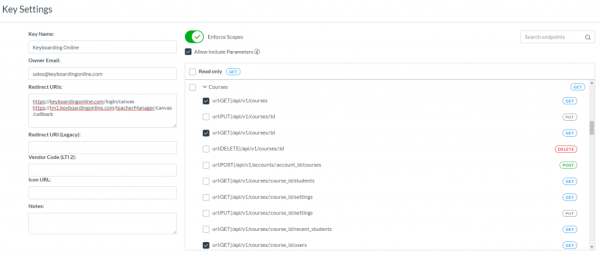
Give it a name like “Keyboarding Online” and set the owner email to support@keyboardingonline.com
If this option does not exist, please read #4 in the Troubleshooting section below.
Click on Enforce Scopes and select the following scopes:
Courses:
url:GET|/api/v1/courses
url:GET|/api/v1/courses/:id
url:GET|/api/v1/courses/:course_id/users
OAuth 2:
/auth/userinfo
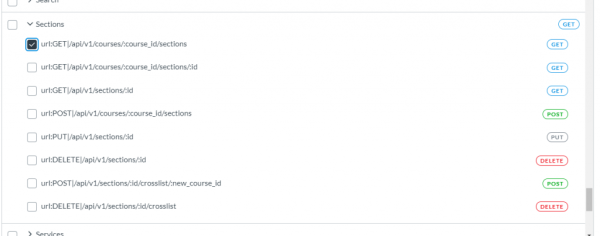
Sections:
url:GET|/api/v1/courses/:course_id/sections
Click Save
Under State, click ON
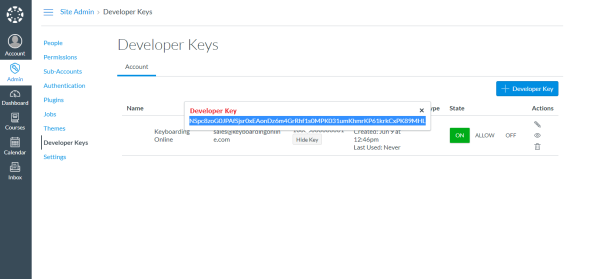
Copy down the ID under Details
Click Show Key
Copy down the key that appears
Provide your district Canvas URL, Developer ID, and Developer Key to Keyboarding Online (support@keyboardingonline.com)
Next Steps
Once the data has been provided by your Canvas Administrator to Keyboarding Online and updated in our system, you will be able to sync your classes and students inside the Teacher Manager.
Go to Classes and click on 3rd Party Sync.
Click on Sync with Canvas
Authorize the application
Choose from the list of classes which ones you would like to sync
Click Import Classes
After importing the classes, they will appear on your class roster, along with all the students in those classes. The password that is generated is their “Canvas ID”. You can provide this to the students, or you can have them log in with Canvas.
Troubleshooting:
If you are not getting a login page or an authorization screen when clicking Sync With Canvas, and are getting an error page that says something like “invalid_client” or “unknown client”, then your Developer ID and Key are not correct in the Keyboarding Online system. Ensure you copied them to us correctly and contact Keyboarding Online with the correct information.
If you receive an error message along the lines of “Error (invalid_scope) A requested scope is invalid, unknown, malformed, or exceeds the scope granted by the resource owner.” with additional information. Then the scopes were not configured properly. Please go to the section above and ensure all the scopes shown are check marked.
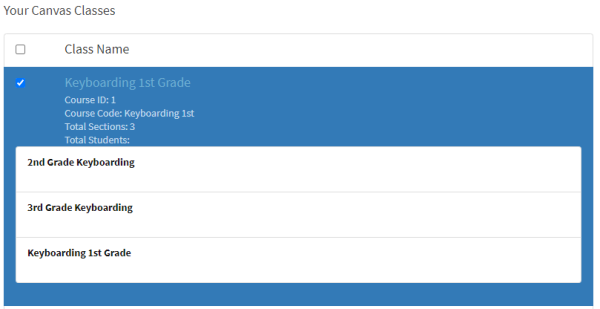
During the sync process, if you are unable to see the count of Total Students, or if you click on a Course and the individual Sections do not contain any students (as in the image below), then you have not enabled Include Parameters in the Developer Keys. Go back to the Developer Keys and enable the Include Parameters. If that option does not exist, ensure the setting is enabled in the Settings > Feature Options section.
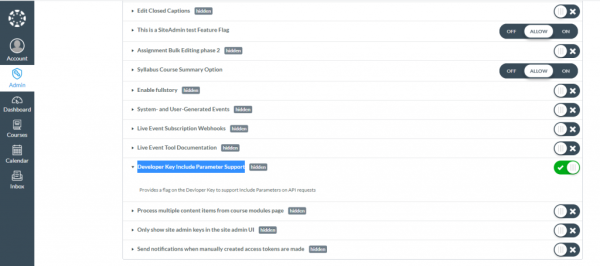
4. If the “Allow Include Parameters” option does not exist, you may need to go to the Site Admin settings and enable it.
Click on Admin on the side menu
Click on Site Admin in the menu that slides out.
Click on “Settings” and then select the tab that says “Feature Options”
In the Site Admin settings, about 4 from the bottom, turn on Developer Key Include Parameter Support. This will allow Keyboarding Online to list students by sections instead of just by course.
After enabling the feature, navigate back to “Developer Keys” on the left menu, and edit the key you were working on before. The “Allow Include Parameters” option should be present.
Logging In With Canvas
To log in with Canvas, go to the Keyboarding Online login page (https://keyboardingonline.com/login) Select Sign in With Canvas and enter the email account you are using with Canvas and hit Enter or click Next.
On the page with the password, you will be able to enter the account password (the Canvas ID by default) or click Sign In With Canvas. When you click Sign In With Canvas, you will be directed to Canvas where you will sign in and authorize the Keyboarding Online application. After authorizing the application, you will be immediately logged into the program.