Syncing makes the account creation and login process easier for both students and teachers. Usually that means students just need to click a button and they are instantly logged in; no passwords to remember, no webpages to visit. There are problems, however, that can arise from using syncing or rostering via 3rd party platforms. This article will hopefully help you understand the syncing process and also provide solutions for the problems you face.
How Syncing Works
To sync a class, our servers will contact your servers (Google, Clever, Canvas, etc) and request all of your classroom data. Keyboarding Online servers then receives a snapshot of the class, meaning a list of all currently enrolled students.
Keyboarding Online takes this data and searches for existing class data and student data and proceeds to take 1 of 4 actions:
- If the student does not exist, create them.
- If the student does exist, have they changed (new name spelling, email address, etc)?
- If so, update them.
- If not, do nothing.
- If the student exists on Keyboarding Online, but is no longer in the class snapshot given to us, delete them.
It is very straightforward when putting it in these terms, but there is a lot more checking that goes on behind the scenes.
The problem tends to arise when students move between classes. What happens is “Student A” was in “Keyboarding 1” and then was moved to “Keyboarding 2”. When we receive the snapshot of Keyboarding 1, “Student A” no longer exists and is deleted. When we receive the snapshot of Keyboarding 2, “Student A” is a new student and a new student is created.
As humans, we can look at two rosters and see that a student has moved between two classes. However, the servers are looking at individual classroom snapshots and have no knowledge of any other classes when processing students. The end result is that a student was deleted and a new student was created, and their work was not transferred.
The Fix
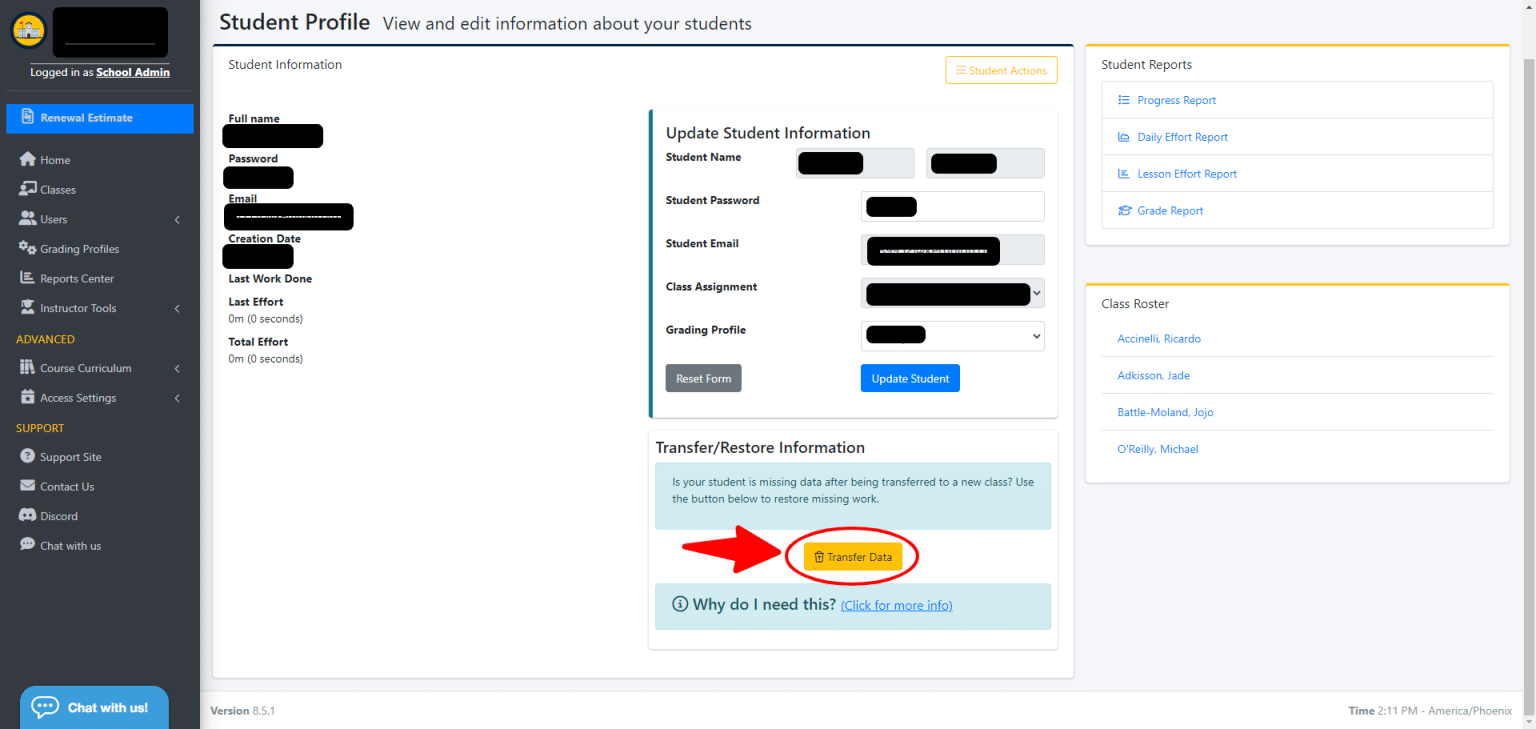
To solve the issue presented above, you can go into the student account in the Teacher Manager by visiting Classes, and then clicking on the student’s name.
Once inside the Student Profile, you will see a box that says “Transfer Information”, with a very brief summary of what it does and a link to this article. The button available will pop up a window on your screen with a list of deleted student accounts and details about the last time they worked and how much work was done. You can select one of those accounts and click the “Transfer” button to transfer the work from the deleted account to the newly created account.
When the student logs back in, their previous work will be there and they will be able to progress in the course from where they last left off.
The deleted accounts take at least 2 weeks to be purged from the system. This means that you should have ample time to transfer the information from the purged student before it is lost forever.

